Control-M/Server Manual Migration
The following procedures describe how to perform a manual migration by exporting the old data from the old Control-M/Server, copying the file and importing it into the new Control-M/Server:
| Task | Description |
|---|---|
|
Before you begin Control-M/Server migration, the Control-M/EM must be migrated to the new environment. |
|
|
Configure the Control-M/Server migration parameters, including whether to prompt for the number of log days to include in the export. |
|
|
Exports the data from the old environment to a file. |
|
|
Importing the Control-M/Server Exported Data to the New Environment |
Imports the data into the new environment. |
|
The following procedures describe the post-Control-M/Server migration process:
|
Editing the Control-M/Server Migration Parameters
This procedure describes how to review and edit the export/import parameters.
Begin
-
Navigate to one of the following directories:
-
UNIX: <server_home>/ctm_server/upgrade/export/data
-
Windows: <server_home>\ctm_server\upgrade\export\data
-
-
Review the Control-M/Server migration parameters in the migration.cfg file, as described in Control-M/Server Migration Parameters.
-
Change the values as necessary, and save the migration.cfg file.
Control-M/Server Migration Parameters
The following table lists the Control‑M/Server migration parameters. These parameters can be defined in the migration.cfg file:
|
Parameter |
Attribute |
Value |
|---|---|---|
|
ASK_LOG_DAYS
|
Description |
Whether to prompt the user for the number of log days to export during the Control-M/Server migration process. |
|
Default value |
No |
|
|
Valid values |
|
|
|
LOG_DEPTH
|
Description |
Number of log days that the user wants to export during the Control-M/Server migration process. |
|
Default value |
100 |
|
|
Valid values |
0 – 100 |
|
|
LONG_TIMEOUT
|
Description |
The time in seconds to wait for jobs submitted to the old environment during Control-M/Server Automatic migration. |
|
Default value |
180 |
|
|
Valid values |
Any positive number 180 or greater is recommended. |
|
|
SHORT_TIMEOUT
|
Description |
The time in seconds to wait for jobs submitted to the old environment during Control-M/Server Automatic migration. |
|
Default value |
60 |
|
|
Valid values |
Any positive number 60 or greater is recommended. |
Exporting the Control-M/Server Old Data
This procedure describes how to export the Control-M/Server old data to a file that can be then imported to the new environment.
For environments that have a large set of data, you can minimize downtime by performing the export in an incremental manner. Begin with one or more exports of the static data (job definitions and historical data), without the need to shut down Control-M Server processes in the source environment. When you are ready for the final export, shut down Control-M Server processes in the source environment and export the active data.
Before you begin:
-
Review the Control-M/Server migration parameters, as described in Editing the Control-M/Server Migration Parameters.
-
For the final export (which includes active data), shut down Control-M/Server and the Control-M/Server Configuration Agent.
Begin
-
Run one of the following migration commands:
-
UNIX: <server_home>/ctm_server/upgrade/export/upgrade
-
Windows: <server_home>\ctm_server\upgrade\export\upgrade.bat
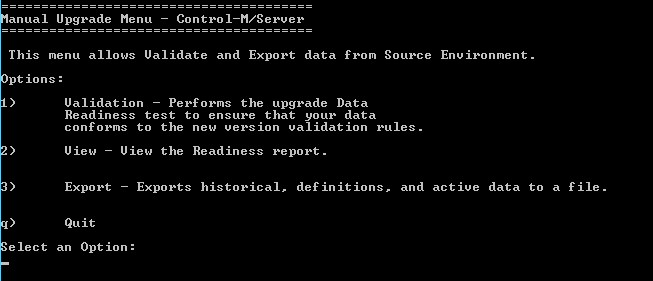
The Manual Upgrade Menu for Control-M/Server appears.
-
-
Enter 1 (Export).
The export process checks for the existence of files of static data (job definitions and historical data) from a previous export. If you are notified that you have already exported log (historical) and definition data, continue with the next step. Otherwise, skip to step 4.
-
If you are notified that you have already exported log (historical) and definition data, perform the following actions:
-
Press enter.
-
In the Export Active Data Menu, choose between a Full Environment export (which includes all data), option 1, or an Active Environment export (which includes only active data), option 2.
Option 2 enables you to complete the export of the remaining data in an incremental export process. However, ensure that no changes were made in the job definitions since the previous export.
-
If you chose an Active Environment export (option 2), skip to step 6, where you will shut down Control-M Server processes.
-
-
For the migration of job definitions, you are prompted to add the new Control-M/Server host to the Authorized Servers list, so that jobs can run in the new environment. Enter Yes.
This option only appears if the old Control-M/Server is up and running when the export is performed. This may take some time.
-
For the migration of historical data, you are prompted for the maximum number of log days to export. Do one of the following:
-
If you do not want to migrate historical data at all, enter 0.
-
For all historical data, enter ALL.
-
For a specific number of days of historical data, enter a number between 1 and 100.
You are prompted for this setting only if ASK_LOG_DAYS is set to Yes in the migration.cfg file. If ASK_LOG_DAYS is set to No, you can still control this number using the LOG_DEPTH parameter in the migration.cfg file. For more information about these migration parameters, see Control-M/Server Migration.
-
-
When asked if you want to shut down Control-M Server processes in the source environment to enable the migration of active data, enter one of the following responses:
-
To enable the inclusion of active data in the migration, enter YES.
-
If you are migrating only static data (historical data and job definitions), without active data, enter NO.
If you do not shut down the production environment, the export does not include the Active Job runtime environment. Such an export can be used to test the export and import process or in an incremental export process. Eventually, on the day of the migration when you can shut down the old Control-M/Server, you can re-run the export to include the Active Job runtime environment.
-
-
Follow the remaining on-screen instructions until the export is complete.

The exported files are saved in the following location:
-
UNIX: <server_home>/ctm_server/upgrade/export/output/<Type of Export>_<timestamp>.tar
-
Windows:<server_home>\ctm_server\upgrade\export\output\<Type of Export>_<timestamp>.tar
In the path, <Type of Export> represents one of the following strings:
-
LDR = Full export of Logs (Historical data), Definitions data, Runtime (Active data)
-
LD = Export of Logs (Historical data) and Definitions data only
-
R = Active data export (Runtime) - continued from a process that was stopped after historical and definition data were exported
-
-
Copy the exported file to the new Control-M environment.
If the exported files are copied using FTP, they must be transmitted in binary mode.
You are now ready to import the export file to the new environment, as described in Importing the Control-M/Server Exported Data to the New Environment.
Importing the Control-M/Server Exported Data to the New Environment
This procedure describes how to import the Control-M/Server exported data to the new Control-M environment.
Before you begin:
-
Shut down Control-M/Server and the Control-M/Server Configuration Agent.
-
Ensure that you copied the exported .tar file to the new environment at the end of the export process (as discussed in Exporting the Control-M/Server Old Data).
Begin
-
Run one of the following migration commands:
-
UNIX: <server_home>/ctm_server/upgrade/import/upgrade
-
Windows: <server_home>\ctm_server\upgrade\import\upgrade.bat
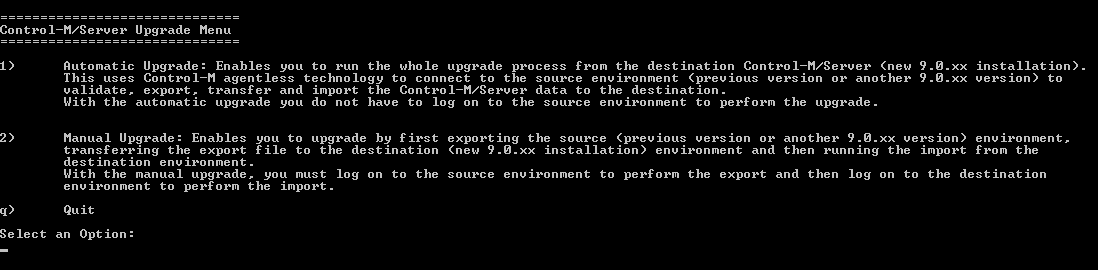
The Control-M/Server - Upgrade Menu appears.
-
-
Enter 2 - Manual Upgrade.
The Upgrade Manual Upgrade Menu - Control-M/Server menu appears.
-
Enter 1 - Import.
-
Follow the on-screen instructions until the import is complete.
The import process converts and imports the data into the new environment.
-
To load the database with all the statistics that are required for performance, run the ctmdbopt utility.
 YouTube
 Twitter
 Facebook
 LinkedIn